Showing posts with label buttonhole. Show all posts

Sunday, July 25, 2010

The Math Dress

Even though just earlier today I had said I was going to make the super-easy dress, I decided not to because I was remarkably close to finishing the math dress. As you may recall, I had plans to make this dress way back around my birthday in May BUT Ikea didn't have the fabric; when I went a few weeks ago they had enough for me to make the dress so I bought it BUT it took a while to do it for several reasons. Two months ago I had made this sketch for the dress:


This was before I realized just how big the printed words were:


I then needed to figure out how to the skirt; I decided on a circle skirt (seen here being cut out on my bedroom floor next to Pebbles's cage)


and, as per usual, messed up my waist measurements and made the waist way too big. So then I had to backtrack a little. I made the bodice and then gathered the skirt to match up with the bodice


 the resulting stitches are grotesque:


So then I made a sash to (a) cover the stitches and (b) cinch the dress some more. I decided to go the way of making two tubes, stitching the ends into a point,


...using my pinking shears to cut away the excess (that's not blood on them, they're reflecting my horrible curtains)...


...and then, after turning them inside out, stitching the two together. this meant that all of the seams were INSIDE the sash, which is awesome in terms of fraying.


You might recognize this pink fabric as the very same I used for the Sencha muslin; as a result (because I went through so many of those) I wasn't sure I'd have enough to make binding tape for the bottom hem, so I just zigzagged stitched it (which always makes me think of my sister).


Then I used the same tube-philosophy as I did for the sash to make the binding for the top of the bodice. Then I did it AGAIN for the straps; I'm particularly pleased with the straps.


 I folded them in half and stitched them to the back of the bodice...


...then I made button holes on the front (two for each set of straps) which I threaded the straps through


and then tied into little bows. Adorable!


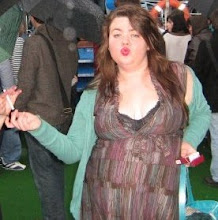
And here's the final product.


I'm very pleased with it, even though:

  • the waist stitching is weird
  • the skirt is off-centre
  • there's no binding on the bottom
  • the bodice is still not fitting perfectly
I think it's wearable and I like it so I guess, in the long run, that's all that matters. Also, it came out remarkably close to my initial sketch. Crazy!

Monday, March 8, 2010

The Refashioned Cardi

Project:Refashioned Cardi
Goals: practice some stitching, put in some buttons

So as mentioned last time I'm still a little nervous about the dress refashioning, so I decided to deal with a sweater I have which I never ever wear. It's a bit weird on me, which you can see from the before and after pictures at the end of the post.


It's nice enough, but I'd like to make it better. I googled "turning sweaters into cardigans" and found this amazingness onThreadbanger, and followed two of their links (one which I adore the asymmetry of and one with a tutorial) so I decided to give it a try. I still haven't been to any craft shoppies so I'm going solely on what I've got in stock. Ethel's got a buttonholing feature, so one of the goals of this was to practice with that.

So I still had quite a bit of this sweater around after the tiger lily incident, and I decided to use it to add contrast to the stripey number which would serve as my base.


The stripey number is a v-neck, which would prove to make the refashioning a bit difficult (and would lead to one of the biggest issues I have with the final product) but I cut out a section slightly to the left side to create the asymmetrical opening.


Then I cut the bottom hem off of the pink sweater to make recollaring the stripey number easier. The collar is my favourite part of the finished product.


Then I used the sleeves from the pink sweater to make the new panels for the buttonholes and buttons. My big mistake here was I decided not to measure them, so they came out uneven. Oops!


I sewed on my uneven panels (which I guess I could argue add even more asymmetry to the final product but I think that's pushing it) and then used the collar from the pink sweater to try to match the collar work I did earlier (not pictured because at this time I misplaced my camera).


Then the Great Buttonhole Disaster happened. I was making some buttonholes and things were going quite smoothly, until I got to the last buttonhole I wanted to make. Ethel decided at this moment to eat a good chunk of my new cardigan.


It took me ages to work out how to get the bit out of her depths, and by that time I had cut a chunk out of the cardigan. I then tried again, and the same thing happened. I was getting really angry at this point, so I took a long break. Then I decided "whatever" and left the gaping hole alone. I think the problem had something to do with the thickness of what I was working with and the bottom thread, but I'm not sure.


After the incident I attached the buttons and am relatively pleased with how it looks. From this picture you can see one of my concerns with this "piece": the huge disparity in the collar. That said, I much prefer it to the weird v-neck thing it had going on earlier, so I don't mind too much.


Now it's time for before and afters! There are three afters, because there are three ways to wear the cardigan: all buttoned up, only the top button buttoned, and unbuttoned. I think I prefer unbuttoned; I like the uneveness of it. It's the closest to grunge I'll probably (read: hopefully) ever get. Although looking at it again I also like just the top button buttoned... it distracts from the fact that the panels are so uneven. Also, I can't believe how much older I look in the "after" shots... Yipes. It could be the lighting (in fact, I hope it is). Anyway, I'm overall pleased with this.