Showing posts with label button. Show all posts

Saturday, March 20, 2010

Sewing Shop Reviews #2 + 3: Place at Belorusskaya and "Season" at Alekseevskaya

This morning I had some work to do at Belorusskaya metro, and then afterwards I decided to hit up this fabric shop called Season I found on yandex, this time searching for "fabric store for clothes" (not gonna make the curtain mistake again). I chose this one because it seemed to have a good selection AND it's on the orange line of the metro, my line. I'd have to pass that station on my way home from Belorusskaya anyway, so I figured, excellent, I'll do that.

I got lost on the way back to the metro after the business I had to do near Belorusskaya and I saw this little shop and figured "what the hell." Let's just say I shouldn't have bothered. It was another curtain shop, with little in the way of service or selection. So I booked it out of there pretty quickly.

Then I went to Season at Alekseevskaya. It was perfect. The women were helpful (after a bit) and I bought some alarmingly inexpensive fabric, a zipper and a button (in case things go awry with the dress I'm planning on making tonight/tomorrow). I checked to see if they had extra long zippers for the pencil case idea and they did not. Oh well, they have tons of fabric, a glorious selection of buttons and ribbons and zippers and even some patterns! I'm in love. Some of the fabric is grotesque but there was not a lighthouse in sight and there were even some prints I liked. And it's so near in my flat (Moscow-relative, of course). Plus there's a giant pet shop across the street from Seasons with tons of rabbit food. I'm very very pleased.

Wednesday, March 17, 2010

The Flamingo Skirt

Project: The Flamingo Skirt
Goals: make a skirt from a pattern I found on the internet

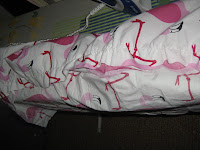
After Googling skirt patterns I found this one, which is adorable and amazing and I thought it would be a good match for this duvet cover I got from Ikea.

I cut the pieces as prescribed from the pattern. I don't have a craft table or a yard stick, which did make it a bit more difficult, I think. I also got craaaaaazy body conscious and added a couple centimeters to the waist measurements because I was terrified of making it too small.


Then I zig-zag stitched the ends, which turns out to be one of the more clever things I did; I'm not the straightest cutter so the zig-zagged bits helped me later to line the thing up.


Next I pinned the zipper in. Looking gooooooood. The zipper is one of the things I'm most proud of about the final project.


After I pinned the rest of the back panel, I sewed it all together.


Then I pressed the fabric for the waist band. Here's where my "add a few centimeters" idea didn't pay off... it's way too big but oh well, better too big than too small.


I stitched the band together.


Then I sewed a long stitch in the top of the front and back panels...


... and gathered the fabric along it.


Then I stitched the top and bottom panels together. It's starting to look like a skirt! At this stage I was terrified that the gathers would come loose.


I turned the skirt inside out and pinned the band to the top...


...and stitched it in.


Then I folded the band over and stitched it from the inside.


I added a button to close the band and voila it's finished!


As mentioned above it's a bit big so I'm going to fold and stitch the band to take some length off of it, then split the side seams to reclose them. I also think at this point I'll add pockets to it, because then it would be perfect.


Monday, March 8, 2010

The Refashioned Cardi

Project:Refashioned Cardi
Goals: practice some stitching, put in some buttons

So as mentioned last time I'm still a little nervous about the dress refashioning, so I decided to deal with a sweater I have which I never ever wear. It's a bit weird on me, which you can see from the before and after pictures at the end of the post.


It's nice enough, but I'd like to make it better. I googled "turning sweaters into cardigans" and found this amazingness onThreadbanger, and followed two of their links (one which I adore the asymmetry of and one with a tutorial) so I decided to give it a try. I still haven't been to any craft shoppies so I'm going solely on what I've got in stock. Ethel's got a buttonholing feature, so one of the goals of this was to practice with that.

So I still had quite a bit of this sweater around after the tiger lily incident, and I decided to use it to add contrast to the stripey number which would serve as my base.


The stripey number is a v-neck, which would prove to make the refashioning a bit difficult (and would lead to one of the biggest issues I have with the final product) but I cut out a section slightly to the left side to create the asymmetrical opening.


Then I cut the bottom hem off of the pink sweater to make recollaring the stripey number easier. The collar is my favourite part of the finished product.


Then I used the sleeves from the pink sweater to make the new panels for the buttonholes and buttons. My big mistake here was I decided not to measure them, so they came out uneven. Oops!


I sewed on my uneven panels (which I guess I could argue add even more asymmetry to the final product but I think that's pushing it) and then used the collar from the pink sweater to try to match the collar work I did earlier (not pictured because at this time I misplaced my camera).


Then the Great Buttonhole Disaster happened. I was making some buttonholes and things were going quite smoothly, until I got to the last buttonhole I wanted to make. Ethel decided at this moment to eat a good chunk of my new cardigan.


It took me ages to work out how to get the bit out of her depths, and by that time I had cut a chunk out of the cardigan. I then tried again, and the same thing happened. I was getting really angry at this point, so I took a long break. Then I decided "whatever" and left the gaping hole alone. I think the problem had something to do with the thickness of what I was working with and the bottom thread, but I'm not sure.


After the incident I attached the buttons and am relatively pleased with how it looks. From this picture you can see one of my concerns with this "piece": the huge disparity in the collar. That said, I much prefer it to the weird v-neck thing it had going on earlier, so I don't mind too much.


Now it's time for before and afters! There are three afters, because there are three ways to wear the cardigan: all buttoned up, only the top button buttoned, and unbuttoned. I think I prefer unbuttoned; I like the uneveness of it. It's the closest to grunge I'll probably (read: hopefully) ever get. Although looking at it again I also like just the top button buttoned... it distracts from the fact that the panels are so uneven. Also, I can't believe how much older I look in the "after" shots... Yipes. It could be the lighting (in fact, I hope it is). Anyway, I'm overall pleased with this.