Showing posts with label stretchiness. Show all posts

Sunday, March 14, 2010

The Morsbag

Project: A Morsbag
Goals: to make a reusable shopping bag, to gain some confidence in using the machine

As mentioned previously, my next project was to make a Morsbag. I followed the instructions on the website (linked to in the last sentence) and here's what happened:

I started with this skirt I bought in Texas two summers ago. I think the last time I wore it was six months ago, which means it could be cut up and used for this.


I measured and cut out the panels for the body of the bag (keeping the side hem original to the skirt as one of the sides of the bag)...


... and cut out from the remaining bits of the skirt the handles.


I pressed the handles with my iron (with no ill-effects to my arms this time)...


... and stitched three rows of stitches to make them keep their shape.


Then I took the body of the bag and aligned the handles inside the top of it.


I then attached the handles with Ethel, first stitching across the top of the bag and then making these strong boxes over the bottoms of the handles. (The flash from my camera makes the black look grey)


Then I stitched up the bottom and the other side of the bag to close it. If you look at the handles it's plain to see that one is much shorter than the other...


... so I made another strong box on the length of the longer handle to try to even it up a little.


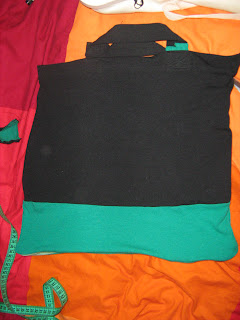
Then I turned the bag inside out and did another row of stitches around the sides (to give it strength, allegedly) and this is the final product:


I'm going to use it as a belated birthday present for a friend of mine, since I've never finished the present I planned on giving her last year. I'm pleased with it; the skirt fabric had quite a bit of stretch to it so I'm glad this worked out.

Friday, March 12, 2010

The White Scarf

Project: The White Scarf
Goals: to make a scarf from an old sweater, to have a white scarf

My plan for my outfit for today (for going to watch Wales v Ireland at an Irish pub and then to go Judey's leaving do) is to wear the dress I finished yesterday and my new spring coat. I realized, though, that I don't have a scarf that would go with this little ensemble. What's a girl to do? Well, I could make a scarf. So that's what I did.

Most of my scarves are pink or purple or blue, but all of them clash with the pattern of the dress. My spring coat goes fairly well with it, though. I decided to make a white scarf to match the outfit (plus I can just wear it with the coat and any other outfit, really).

I have this sweater from Zara that is a little too tight (turns into a sweater-bra, basically) and I never wear it. So I figured, why not refashion it into a scarf? Earlier this week, when I started the whole refashioning-thing I was hesitant because I'm kind of a pack rat and I don't like getting rid of things. But now I'm totally okay with it if I can wear it now as something else. At least it's getting use.


I cut the sweater up into pieces for the scarf.


The initial idea was to use the two strips from the body as the middle of the scarf, and use the sleeves as the ends. So I turned the sleeves inside-out and stitched the cuffs closed. The sleeve on the top is right-side-out, and the sleeve on the bottom inside-out.


Then I attached the body parts with the sleeves by using the same techniques as making bias tape: I put the pieces at right angles to each other...


And stitched a diagonal seam.


Then I cut the seam allowance off and unfolded the pieces. Voila!


Here are three of the pieces connected with two diagonal seams.


I attached the sleeves and figured I had finished my scarf. But, if you look at this picture, you can see that the scarf ended up looking like either a child's pair of tights or a scarf with gym socks sewn to the ends. Oh dear.


So I cut some more fabric from the sweater to elongate the scarf and get rid of the gym socks. For the ends this time I decided to use the hemming detail where the sleeve met the body of the sweater, turned inside-out.


I sewed them all together and here's the final product, on my kitchen chair.


I'm very happy with it; since I used both the front and the back of the sweater to make the scarf two-ply it keeps its shape very nicely (without looking like a neck brace). It's a bit uneven on the sides (because the sweater was a little stretchy) but I'm not bothered. It looks decent on. So, here it is on my rack of scarves:
...and here it is with the dress from yesterday and the spring coat.

The Refashioned Dress

Project: The Refashioned Dress
Goals: to make a dress I can actually wear out of the house

Well, I've finished the dress. The dress which I started last night. After rereading my posts I've discovered that I can be a bit negative about things. I mean, I've had the machine for less than a week and I've done quite a bit with it: the cardi, the skirt mending, the zipper, the board marker ball, and now this dress. The problem is I've become quite frustrated with myself for not being better at what I'm doing. After thinking about it (while wearing the dress at one of its less-finished stages) I've decided I'm going about this all wrong. I need to do small projects, build up my confidence and skill, and then go into doing bigger ones. That said I still felt obliged to finish the dress.

Okay, now that my self-analysis/pep-talk is over I can get to the dress. The plan for this dress was to take this pink number
and couple it with this skirt I bought it at Texas Thrift, which I thought would be cute to cinch with a belt and boom instant strapless dress. The problem was that the elastic at the top of the skirt did a wonderful job of digging into my chest, so it looked odd. I was going to still keep the pink M&S dress as the exterior of the dress but line it with the skirt, then make some straps. As you'll see, the final results were pretty much the opposite (not literally, though; I don't even know what that would look like).

First I'd like to mention that the brand of the skirt was "Phool."


Okay, so I cut the elastic waistband off and then I cut along one of the seams. This is how much fabric I had to work with, aka "tons".


I pinned the dress to where I wanted to sew (the idea was to sew the top panel of the skirt to the top panel of the dress). I was quite pleased with myself here but I should've realized that my careful planning could not and did not take into account my new greatest foe: stretchy fabrics. I HATE THEM.


So what happened next? Well, I did one half of the dress by keeping the pink dress taut, because I figured the elasticity would hold. Well, it doesn't. Also my stitches went all wonky. Here I became annoyed, but I soldiered on. I finished the stitching (because of my obsession with keeping the pink dress taut to try and keep it stretchy I didn't have enough skirt to line the dress) and tried the dress on. Disaster. You know how when you look in your closet and you see something you haven't worn in ages and you're like "why don't I wear that anymore? It's soooo cute" and you put it on and there's always something that makes you go "ohhhhhhhhhh that's right" and you hastily take it off? Yeah, this pink dress was one of those items (as you can see from the before picture). With the lining of the skirt it became even worse. I was pretty close to devastated. I mean, my goodness. Why can't at least one thing I make turn out the way I want it to?

It was at this point that I stopped taking pictures because I got so annoyed with everything that had to do with everything. On a whim I turned the dress inside out and realized, "Hey, wait a second... this doesn't look half bad." The pattern of the skirt hid my horrible stitches and actually looked fairly decent.

The only problem was that it didn't close completely (because of the point above about running out of skirt fabric). So I took the dress off and stitched up the lower part, which came out surprisingly okay.


For the next step I stitched up the top half. The upper "hem" is a little uneven because I haven't sewn it but to be honest I don't have much faith in my sewing abilities right now and I'm terrified to ruin the dress. So, here's the before and after:


I cinch it with a belt, obviously, so in a poetic fashion the skirt has now reached the potential I saw in it earlier this year. I don't hate it at all. I tried to take a picture of the back but this was the best shot I came up with:

My god but I have a lot of hair. The back isn't fantastic so I plan on wearing this dress with a cardigan; I'm fairly certain cardigans were invented for this exact reason.

Here's a picture of the dress on my bed:
Anyway, I'm making a promise to myself to not be so overambitious. My next project will be a Morsbag which I think i can do with little to no fuss from the rest of the fabric of the skirt (I'm putting off the apron for now).

Wednesday, March 10, 2010

The Overnight Bag

Project: The Overnight Bag
Goals: install a zipper with very little fuss

Appropriately enough, the overnight bag project spanned overnight. I decided to use an old H&M top of mine (purchased in Amsterdam in 2005) which I never wear anymore because the front has a weird line, then I did all of my measuring, cutting and pinning (before I let Pebbles run around I did a careful search of the floor where she likes to run and found the prodigal pin cushion next to my fan, for some odd reason). Here's the process:

Here's the bag. It's quite large; I measured the base to get an idea of how big the zipper panels should be (55,5 cm x 14,2 cm) and then added some to even it out a bit and give me some seam allowances.


Here's the zipper I purchased, which is longer than 55,5 cm, which I was pleased about.


Here's the top I'll use for the paneling; it's very stretchy, which made it hard to work with later on and which annoyed me mildly.


I measured the panel out from the back of the top, and then I put dots at regular intervals to help me cut it out since it's so damned stretchy. I put the dots on the inside of the top, thinking I'd use the outside as what would be visible, but I realized after I had made the dots that it might be better if the colors were a bit muted. Even when I go into something planning to plan every little thing, I still make split second decisions. Annoying.


Here's the panel I made; you can see the edges are a bit jagged because I simply cannot cut in a straight line.


Then I cut the middle out of the panel all the way to the bottom hem. One thing I do always try to do is use any hem already included in the fabric I'm refashioning so I don't have to bother with it; the only flaw with this one is the hem thread is black, whereas I used white for the stitching. After that I pinned the zipper in and smoothed out any puffing that occured because of the stretchiness. Then I turned the bag inside out and started to pin the panel into it to see how it would look.

After attaching both ends of the panel I turned the bag right side out again (and pricked myself at least 12 times with all the pins) and admired my work up to that point.


I decided not to use the machine til this morning because, as I've mentioned, she's noisy, so Pebbles was able to doze peacefully while I was working. (She's pictured sleeping under the laundry drying rack, which is her favourite place to nap outside of her cage. Don't be alarmed by the red thing next to her bum; it's some piece of something, not a piece of her.)


This morning I turned the bag inside out and stitched it all in together but experienced HUGE issues with the stretchiness of the fabric.


I even changed the foot to a zipper foot, although in all honesty I'm not 100% sure what it did for me.


This is the final result. You can see that the stripes don't match up anymore, because of the damn stretchiness of it all. Next time I install a zipper I will not use such stretchy material. That said, the stitches seem to be holding up well and it does keep the top closed, which is all I really wanted.


The end of the zipper is a bit nutso and it's very difficult to get this part stitched properly with the machine, so I think I'll have to do some handstitching to get the thing not to open on itself.


Here you can see the great disparity between the two sides of the fabric. I know, though, that this is not the fault of my planning in terms of measuring because I did a damned good job. It's because of the stretchiness. So I'm not too upset. The panel on the top is the one I did second, when I started taking into account the stretchiness. I learned a lot about fabric types (i.e. don't use the rest of the shirt until I've figured out how to deal with it) so that's good. At least I'm learning things.