Sunday, April 25, 2010

Vaskova's Birthday Bag

Project: make a bag for a friend's birthday
Goal: make it something I'd be proud to give as a gift

So a couple of weeks ago I saw this friend/colleague of mine walking through Central School with one of those plastic bags people in Russia love to use to carry things in. I don't particularly like these, so I offered to make said friend a bag. She seemed excited so I asked some questions, like, what colours and style. She offered up grey, and when pressed to give information about a preference for a colour for lining/accenting, she decided on dark blue. Then she said she'd like something like this, a bag we got in many colours from CUP when we were choosing new course books last year:


I searched the internet for some bag patterns and really thought I'd be able to use this one, but it wasn't big enough. I loved the idea of a "choose your own" adventure bag (quotes are the authors). So I decided that since this friend of mine (we'll call her K, even though the title of this post has her name in it so I don't know why I'm being coy with the information) had explicitly stated she liked the idea of the Cambridge tote I'd make something very similar for her.

Another thing I kept in mind while planning was that K is obsessed with the Union Jack. My first plan was to make an accurate outline of the Union Jack on the front of the bag but I'm not really that into it myself, so I instead came up with a more off-centre interpretation (represented above with the help of Microsoft Paint).

These are the fabrics I chose: a grey linen for the main body of the bag and the straps, and a pretty dark blue for the lining/stripes of the Union Jack.


The pictures don't really do the blue justice. Anyway, I cut one long panel from the grey for the bag, and from the blue from the lining, and then I cut two strips for the handles from the grey and eight strips from the blue for the Union-Jackesque stripes. I also wanted to add a bow because I really really like bows.

First I made the handles; I reinforced them with some of that fusible interfacing business. It was at this stage that I became superpleased with my choice of the grey fabric. I actually fell in love with it.


Then I added the first two stripes in the front of what would be the bag; in my early stages of planning this is where I thought I'd stop with the stripes but I'm glad I didn't because it is very Finnish-flag.


Next I added the diagonal stripes, which I did a very bad job of lining up but to be honest it was not one of my main priorities so I'm telling myself that if I had thought harder about it they would've turned out more aligned.


Since I had finished adding the stripes I then took my first ever stab at lining something. I am so happy with how it turned out, too. I think I'm going to line everything from now on. Amazing.


I stitched over the tops of the sides to cover the raw edges...


...and then stitched from the inside straight down the sides to create, in essence, a sack.


Using the Cambridge bag as a guide I pinched the two bottom corners into triangles and stitched horizontally across the base of the triangles, creating a quick and easy base for the bag (which you can see here from the inside).


And this is how it looked on the outside after I added the handles. Adding the handles took me about an hour and a half because Ethel kept tangling the bobbin thread; after much angry searching on the internet (and changing the needle) I discovered it was actually my fault, as well as the top thread's fault, but mainly mine because I had threaded the top thread wrong.


Pretty, right? I was tempted to leave it like this but I had become obsessed with the idea of a bow. So I used this YouTube tutorial and made this one (not the prettiest, I know, but I'm such a lazy cutter; one of my goals for my trip to America this summer is to get a decent cutting board and rotary cutter):


Then I stitched the bow to the bag at the point where the stripes all meet on what I decided would be the front and voila! the bag is finished!


I LOVE it. I really hope K loves it too. The stripes are fraying a lot but I don't really mind; we'll see if she does. Here are some more pictures of it:

front


back

I think it turned out really well. It's kind of like something a trendy, subtle Dallas Cowboys fan would carry. Are there any trendy, subtle Dallas Cowboy fans? Bitchy.

Sunday, April 18, 2010

Productive Weekend

Project: make a skirt
Goal: I need a white skirt to match the sweater I made last weekend

So I couldn't wear the sweater I made last weekend last week because it doesn't match any skirts I already have, which was a bit of a surprise since I have a ton of skirts. So I decided to make a white skirt out of the remaining fabric from the sheet I used in previous projects.

I wanted to use one of the patterns in my Burda magazine (to practice with patterns) but I don't have a perforating wheel-cutter so I couldn't. Instead I followed the same basic ideas as the flamingo skirt (this time from memory). I ran into the same problem as last time: the waistband is too big. I just can't figure out how to make it fit better. Luckily I have tons of belts to cinch the skirt up but still.

Also, since the sheet was not the newest of sheets it had some problems (slight staining and some rips) but I think I worked around them alright. I'm particularly proud of the button and zipper, and I did a very careful job on the hem. If only I could get the waistband right I'd be superhappy.
I also decided yesterday morning to turn this purple dress I bought from Kohl's a few years ago into a skirt; the problem I had with the dress was the bodice part never fit right and the dress was quite short. I didn't want the skirt to have the same problems (surprise, surprise, though; it did, in terms of length).
I took the elastic I had used to make the Morsbag and stitched it into a pouch at the top of the skirt. I like the way this turned out, even though, for silhouette- and modesty's-sake I'll have to wear it layered under a longer top. And it was superfast. Plus I elasticized something, so that's another skill I've learned. So here are the two finished pieces:


Not bad for a weekend's work, I don't think.

Wednesday, April 14, 2010

Goals

So I've decided that the thing I need to do, first and foremost, is establish more long-term goals for myself. This will motivate me to actually improve instead of just flouncing around without purpose. For this, I have established three goals for myself. They can be divided into two categories: habits and dresses. The first category, habits, is addressed in the first of my long term goals, listed below. The second category, dresses, involves two dresses I want to make inspired by two of the characters I loved from childhood and have been obsessing over lately. I know this raises my nerd-quotient up pretty high but I don't mind. I figure if I can do this, I can find more general inspiration in other things, like wanting to be a lady-mayoress. Okay, so my goals are:

1: join Wardrobe Re-Fashion for two months starting May 1st (allegedly you can sign up from April 15th but it is right now April 15th and I still can't sign up, so maybe later in the day)

2: make a dress inspired by Carmen Sandiego. I've purchased this pattern from eBay and it has an average difficulty, which makes me nervous but I have tons of time to practice before I go home in June/July and pick it up. I figure I'll do it in red with the waist-tie in yellow; I'm looking for a fairly literal interpretation here.

3: make a dress inspired by She-Ra. I'm still looking for a pattern that I think will fit in that style and, again, I'm looking for a fairly literal interpretation BUT maybe with a bit more length than she-ra would go for. Also, I'm looking to make a red cardigan to mimic her cape. An entire She-Ra outfit!

So those are my long-term goals. What I have to start doing is following patterns better. Or at all. So my next project(s) will be based around that.


Sunday, April 11, 2010

UPDATE on "The Refashioned Dress"

So I finally finished what I wanted to on that dress from a month ago: I added straps and hemmed the top and the bottom. I think it looks adorable now. I'd like for the waist to be more fitted but I'm afraid I'll ruin the whole thing if I try that, so I'm leaving it for now.

The Refashioned Sweater


Project: refashion one of the sweaters I bought in Lithuania
Goal: to practice (pretty basic goal, I think)

So this is one of the three sweaters I bought in Lithuania that are okay are on their own. The keyhole detail on this one was what really sold me on it, but, being a busty lass, it didn't fall in the right place. Instead of trying to move it down or something, I decided to refashion this sweater into something with a sweetheart neckline (much more flattering, and it appeals to the side of me that adores low-cut numbers).


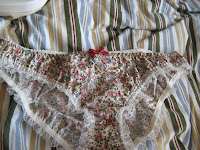
I also felt like the pink was a bit much on its own, so I decided to line the new neckline with the fabric from these panties. Don't worry, they've never been worn. I bought the biggest size they had, which turned out to still not go over my thighs, but I love the print, so I figured I'd use them on this project.


I cut the panties up into strips (I plan to save the lacy bits for an as-yet undetermined project)...


...and cut the new neckline out of the sweater.


This was all done yesterday. I wasn't feeling 100% so I was very slow about it and by the time I'd finished it was too late for me to sew (Ethel can get a bit noisy). When I got up this morning I decided before I set to work on the sweater I should organize my two boxes of scraps and notions and also my ever-growing bookshelf. So here's the before and afters:

The fabric scrap box before...


I know it doesn't look much better, but I've put all the scrappy bits in ziploc bags and wrapped the larger pieces around cardboard, so it's much better organized.


Here's my notions box before...


...and after. Turns out I have a seam-ripper! Who knew.


And the bookshelf, which first only had The Sewing Book and a copy of Burda magainze I bought in Lithuania...


... and now has Sewing Green: 25 Projects Made with Repurposed & Organic Materials, Vogue Sewing and The Dressmaker's Technique Bible as well, all of which are amazing. Sewing Green has the most adorable idea for a lunch bag and sandwich wraps which I really wanted to make this weekend but I'm still not feeling great so no trip to the fabric shop for me. Oh well. It's also got some cute skirts and dresses and one dress for little girls which I've accepted a dare to make in my size.


Okay, intermission over. I pressed the panty bits in half and then pinned them around the sides of the neckline (except the sweetheart bit).


Then I sewed them on.


I trimmed back the seam allowance (which I should put in quotation marks because I eye-balled it to the max) and pressed the panels for the sweetheart part.


Then I stitched them on, trying really hard to keep the integrity of the shape of the neckline. I don't think I did too bad of a job. Here's where I just want to say that when I look at this picture I think "Oh, it looks so much better on!" which is ideal, in my opinion. Few things are worse than seeing something and being like "cute!" and then seeing it on and feeling horrible.


I decided to jazz it up a little by making a bow out of some of the elastic from the panties...


...and attaching it at one of the corners of the neckline. Supercute and girlie, but not little-girlie, I don't think.


So here's what it looks like on; one issue I'm worried about is that I kept making adjustments and trying it on without wearing a bra (I still have yet to try it on with full support) so I worry it won't look as good. That said, I think it turned out really pretty and I'm mildly annoyed that it's finally warming up because it's gradually getting out of sweater/cardi season and I've just started having fun with them! Oh well.


There's a bit of pinching on the sweetheart part, but I don't mind. I knew it wouldn't be perfect. I think my next project's going to be a wallet, or maybe another sweater conversion. This time into a cardigan since it is getting so warm. Who knows.


Sunday, April 4, 2010

The Ruffled Apron

Project: The Ruffled Apron
Goal: to practice gathering

Two of the pieces Tasha brought over yesterday were this skirt...


...and this dress. I thought they went really well together, so I thought I'd make a ruffled apron like this one out of them.


I cut all the pieces to the specifications on the website (I decided to make two ruffles from each of the pieces, then use the waistband from the skirt as the band of the apron and extra from the dress to make the straps; also, I used some more from the sheet I used for the convertible dress as the back of the apron)...


...and harvested the buttons from the dress and skirt (supercute cloth-covered buttons!).


Pebbles was running around at this time, sniffing the cloth (Tasha uses different laundry powder than I do, I guess) and then playing with the tape measure, as pictured left.


I hemmed the edges of the back of the apron...


...then hemmed the sides of the ruffles. I didn't do the bottoms because I'm l-a-z-y. I also stitched a loose stitch along the top for the gathering part.


I gathered the tops of the ruffle panels and then fit them on to the backing (step one seen here...


...and steps two through four here)


Then I stitched the straps and the band on to the edges of the apron.


Ta-da! A finished apron! You can see on the first picture just slightly where the band meets the panel on the right it's a bit bunchy, and then in the second pictures on the top left why that is. There were just so many layers going through the machine I think it got a bit confused. And overwhelmed.

I was going to give this to Tasha as a wedding present and then realized that that is very 1950's so I'm just gonna give it to her and think of something else as a present for the wedding. I'm quite pleased with it and it didn't take me very long at all.


I think this would've gone smoother if I hadn't been refashioning from a dress and skirt, both of which had pockets. That said, though, it turned out surprisingly well. My next project is a very simple one, to put an old skirt of mine under a dress I've never worn to make the dress decent enough to wear out and about. I might even do that today, since I've still got so much time.